Wednesday, March 12, 2014

IOS 7.1 WILL LIKELY BE THE LAST UPDATE FOR THE IPHONE 4

The iPhone 4′s days could be numbered according to a recent report from Ars Technica. Reportedly iOS 7.1 will be the last major firmware update for the smartphone. This is of course due to the iPhone 4 just not being able to handle all the complex animations of iOS 7. Its A4 processor just doesn’t have enough kick and it is painstakingly obvious when using an iPhone 4 on iOS 7.
iOS 7.0.1 actually improves things by shortening the animation durations, thereby easing some of the burden on the processor. It also smoothed out most of the jerkiness in the UI which was present when opening apps or pulling up the control center window shade.
Launch times of applications were also improved for apps like Safari, Camera and Mail.
iPhone 4 App Launching Table
With that said there are some things that iOS 7.1 still can’t overcome due to the A4 processor and that is why the following features are absent from the iPhone 4.
  • 3D Flyover or turn-by-turn navigation in Maps
  • Panorama mode or Live filters in the Camera app (filters can still be applied in the Photos app after the picture has been taken)
  • AirPlay Mirroring
  • Siri
  • AirDrop
  • Graphical effects such as the translucency effects throughout the OS, live wallpapers, and the parallax effect of the Home screen
Apple rarely moves beyond x.1 versions of its mobile operating system and with iOS 8 on the horizon the iPhone 4 will  likely remain planted on iOS 7.1 the rest of its lifespan. Those wanting the ability to run iOS 8 and beyond will need to update to the iPhone 4s or later.

Sunday, March 2, 2014

APPPLE Working On iOS Update To Improve TouchID

The fingerprint reader on the iPhone 5s is not perfect and does have the occasional hiccups. In fact one issue that has been brought up time after time again on the Apple support forums is the ‘fade effect.’ This involves the accuracy of TouchID fading over time.
TouchID
Luckily if you’re experiencing this issue or problems with accuracy in general there could be a light at the end of the tunnel. According to a report from AppleInsider Apple is preparing a software update that will improve the fingerprint recognition experience of Touch ID, and possibly fix the fade issue.
“A source familiar with Apple’s development plans said the company is well aware of early adopter issues that many iPhone 5s users are experiencing with Touch ID, the fingerprint recognition feature introduced last year after acquiring AuthenTec in 2012.
After launching iPhone 5s last fall, Apple has continued to work with the original AuthenTec team to improve its recognition software and will release an update relatively soon, the source confidently reported.”
Of course ‘relatively soon’ is not very descriptive, but hopefully that means we will see these improvements implemented in iOS 7.1.
Have you experienced issues with Touch ID or the fade effect?

Evasi0n7 Updated To Fix Bundled (Cydia) Package List Issue

The Evad3rs have just released a new version of Evasi0n7 (1.0.7) which includes a fix for those not getting Cydia package updates. Unfortunately because the bug revolves around not getting updates via the Changes tab in Cydia it means the Evad3rs had to release a new version of the tool, rather than release a Cydia package.
Evasi0n7 1.0.7 mac os x download
As such if you are experiencing this issue it means you will have to restore back to iOS 7.0.6 and then re-Jailbreak using this new version of Evasi0n7.
This version of Evasi0n7 supports  iOS 7, iOS 7.0.1, iOS 7.0.2, iOS 7.0.3, iOS 7.0.4, iOS 7.0.5 and iOS 7.0.6. It is compatible with all devices capable of running iOS 7. 

FIX POOR BATTERY LIFE On iOS 7.1

 If you’re experiencing poor battery life after updating to the iOS 7.0.6 firmware on your iPhone or iPad (typically accompanied by your device feeling abnormally warm) then you will be glad to know a solution has been discovered which has helped many people with their battery woes.
This quick fix is courtesy of OS X Daily who shared stories of users who could actually watch their battery percentage go down.
low-battery-angry-man
The first thing you will need to do is very simply kill ALL the apps running in the background of your iPhone, iPod Touch or iPad. Keep in mind that you can close 3 at a time using multiple fingers.
Next you will simply need to hard reset your device by holding both the Home Button and Power Button until you see the Apple logo.
After completing these steps many users have reported that their battery life has returned to normal.

Wednesday, February 12, 2014

NEW CYDIA TWEAKS Pluck 2 And AppETA Are Two Cydia Tweaks You Should Download Right Now


Many Cydia tweaks are released in any given day, but here are two I feel are worth your attention.
Pluck 2 is a tweak for iOS 7 that allows you to easily play any song for your iOS Device’s music library from both the lockscreen and the control center. What the tweak does is add a little icon to the bottom left hand corner of the lockscreen and control center where you can gain quick access to your device’s music library.
pluck2-0
From the music library screen you can then either a pick a song that you want to hear, or queue up songs by selecting multiple songs by tapping on the + button next to the song.
pluck2-1
It’s a great tweak for those that like to constantly switch their tunes and can be found in the BigBoss repo for only $0.99.
AppETA is a new tweak that gives you useful information when you’re downloading an app from the App Store. By default when you download an app you don’t know how long it will take to download, your current download speed or any other remotely useful stats.
With AppETA you are given more information such as the size of the app, the time it download the app, the download speed etc. which can be quite useful when downloading large apps.
AppETA
Once you install AppETA all you need to do is double tap the icon being downloaded and a popup will appear with the information. You can also play around with the numerous preferences the tweak has such as changing the theme of the popup from dark to light, customize the color of the progress bar and so much more.
You can download AppETA from the BigBoss repo for $0.99.

How Much Of Your Smartphone Is Actually Screen? [Infographic]


It’s no question that nowadays people want smartphones with bigger screens without actually increasing the physical size of the handset. As such the only way around this for manufactures is to minimize the bezel surrounding the display.
A new chart by somospostpc has just been released that now quantifies this trend by charting how much of a phone’s surface is actually the screen. The chart is based upon the percentage of the smartphone’s surface which is the display and not the bezel.
Take the iPhone 5s for example, it occupies 60.6 percent of the handset where the iPhone 4s only occupies 54%. Of course the monstrous Android smartphones fare better with the lG G2 occupying 75.7% of the surface area.
smartphone-display1-776x1024
Let’s hope the iPhone 6 fares better than the current generation models.

Themer, A Popular Android Theming App, Pulled From Google Play Due To Apple Copyright Complaint


The popular Android customization app Themer by MyColorScreen was recently pulled from the Google Play marketplace due to the fact that it contained a theme called ‘Seven’ that looks exactly like iOS 7. In fact it looked so alike that Apple filed a copyright complaint with Google, forcing the search engine giant to remove the app to avoid further legal ramifications.
Themer Android Theme App
Despite the fact MyColorScreen allowed users to browse a selection of themes, that one theme alone was enough to have it pulled. TechCrunch reported:
“The theme in question is the “Seven” theme, which Apple says uses several icons that infringed on its own patents, explains Ashvin Dhingra, co-founder and CEO at Themer.
“We immediately removed [the Seven] theme and thought that, at worst, Themer would be back on Play in a few days. But now a week later, we’re facing the possibility that a few days might turn into a few weeks,” Dhingra explains in an email to TechCrunch (and soon to be blog post on the company’s website.)”
Of course part of the reason for Themer’s removal is because it isn’t just some homebrew project, the team behind the app made over $500,000 in funds last Fall. Now that the Seven theme has been removed though, Apple has no more issues with the app and it can technically return to the Google Play store.
“We’ve spoken to legal representatives from Apple (who have been very nice, reasonable, and helpful), and they have no remaining concerns. But apparently, Google has a process for these things, and there’s nothing we can do to accelerate that process.”
That’s one of the issues with the Google Play store is that there really isn’t much communication with Google and developers so there is no telling when Themer will return.

NEW CYDIA TEWAKS SubtleLock (iOS 7) And Forecast: Two Cydia Tweaks To Customize Your LockScreen


How would you like to bring the weather and other subtle changes to your iOS 7 lockscreen?
SubtleLock (iOS 7) moves your clock up to the left hand corner and the date to the upper right with a smaller font, making the lock screen appear modern and less cluttered.
SubtleLock (iOS 7) Cydia Tweak
After installing SubtleLock users will find its preference pane in general Settings where there are a host of options to choose from. There are three sections: Clock, Sliders and Miscellaneous.
Some of the obvious options to choose from are to turn on or off the clock, show seconds, and  hide or show the slider. Then theres the ability to change the label colors, hide the date, hide the camera button, hide the Control Center and Notification Center grabbers, without having to re-spring your device.
SubtleLock (iOS 7) Settings Cydia Tweak
SubtleLock (iOS 7) can be found on the BigBoss repo, is $1.00, but is a free upgrade to those who already own SubtleLock.
Forecast is developed by David Ashman which looks like it takes design cues from the stock Weather application in iOS 7. The tweak replaces the slide to unlock and provides a weather widget in the bottom left hand corner displaying the current weather condition and dynamic wallpapers. Users can also swipe left on the lock screen to display a more detailed weather forecast, just like they can if they open up the weather application.
Forecast Cydia Tweak
The forecast tweak offers a preference pane in general Settings where users can show their current weather or the first manually-set weather location from their weather application, enable or disable the forecast page when swiping to the left, and darkening the wallpaper for easy visibility if the wallpaper is too light. The tweak also offers the ability to display animated weather wallpapers based off their current weather conditions on the Lockscreen or Homescreen.
Forecast Settings Cydia Tweak
Forecast can be found on the ModMyi repo for 99 cents or its a free upgrade to anyone who has the previous version.
Let us know what you think of these two tweaks in the comments.

NEW CYDIA TWEK Lockscreen Extender Cydia Tweak: Set A Lock Screen Dim Delay

Are you tired of having to tap the home or power button to keep your screen awake? Would you like to be able to set a dim delay, so you can view those sweet widgets or animated wallpapers for a longer time, then look no further than a tweak called Lockscreen Extender developed by FreeApple for iOS 7.
Lockscreen Extender Cydia Tweak
After installing the tweak head over to its preference pane in the general Settings application. Users will be able to enable or disable the tweak, choose a dim delay for the lock screen, set a dim delay when the device is plugged into an outlet, and hide both the clock and date on the lock screen.
Take note, when applying a regular delay time for the lock screen which is called dim delay, be careful which setting you choose so you don’t eat up your battery life. Of course users don’t have to worry about the battery life when setting the docked dim delay option, because the device will be plugged into a power source.
Users will have 10 options for dim delay, from default to 1 hour, while the dock dim delay will allow for one more option, forever.
It looks like this tweak is made for those who use lock screen widgets because it also gives you the option to hide the clock and date. I’m sure there are other reasons other than widgets though. LockScreen Extender is available on the ModMyi repository for 99 cents. Let us know what you think of the tweak in the comments section below.

Why FlappyBird Was Removed From The App Store

I have chosen to hold off reporting on all the FlappyBird news because I think it’s hilarious how much of an impact this dead simple (no pun intended) game has had on people and I think I speak for a lot of people when I say I really could care less about it. But not that there is some sort of official statement about why it suddenly disappeared from the App Store I thought it would be worth sharing.
In case you haven’t heard the story, Dong Nguyen, the developer of Flappy Bird, a highly popular game with graphics resembling Mario where you tap the screen to avoid hitting pipes, pulled his popular game from the App Store abruptly a few days ago.
FlappyBird Game
This surprised a lot of people due to the fact the developer was making over $50,000 a day from ad revenue and it had been downloaded more than 50 million times before being removed.
Many people speculated that it was because Nintendo had asked Apple to remove the game, but Nintendo actually released an official statement saying it wasn’t them.
Forbes recently interviewed Nguyen though and now we have the answer to why it was removed.
So just what was the reason?
It was an addictive product and Nguyen didn’t like that.
“Flappy Bird was designed to play in a few minutes when you are relaxed,” says Dong Nguyen, in an exclusive interview, his first since he pulled the plug on the app. “But it happened to become an addictive product. I think it has become a problem. To solve that problem, it’s best to take down Flappy Bird. It’s gone forever.”
He also said he was uncomfortable with the attention and success the game brought him and wanted some peace.
In mulling whether to pull Flappy Bird, Nguyen said that it was guilt – atop the fact that “my life has not been as comfortable as I was before” – that motivated him. “I couldn’t sleep,” he said. He added that his conscious is relieved; he spent the past few days, Internet-free, catching up on slumber.
“I don’t think it’s a mistake,” he says. “I have thought it through.”
Nguyen said he has no plans to remove his other two “harmless” games Super Ball Juggling and Shuriken Block and stated he still plans to develop new games.
It’s crazy to think someone would just walk away from a jackpot like FlappyBird which only took 2-3 days to develop, but hopefully Nguyen will get what he wants now and iPhones will stop going for thousands of dollars on eBay with Flabby Bird installed.

Themer, A Popular Android Theming App, Pulled From Google Play Due To Apple Copyright Complaint


The popular Android customization app Themer by MyColorScreen was recently pulled from the Google Play marketplace due to the fact that it contained a theme called ‘Seven’ that looks exactly like iOS 7. In fact it looked so alike that Apple filed a copyright complaint with Google, forcing the search engine giant to remove the app to avoid further legal ramifications.
Themer Android Theme App
Despite the fact MyColorScreen allowed users to browse a selection of themes, that one theme alone was enough to have it pulled. TechCrunch reported:
“The theme in question is the “Seven” theme, which Apple says uses several icons that infringed on its own patents, explains Ashvin Dhingra, co-founder and CEO at Themer.
“We immediately removed [the Seven] theme and thought that, at worst, Themer would be back on Play in a few days. But now a week later, we’re facing the possibility that a few days might turn into a few weeks,” Dhingra explains in an email to TechCrunch (and soon to be blog post on the company’s website.)”
Of course part of the reason for Themer’s removal is because it isn’t just some homebrew project, the team behind the app made over $500,000 in funds last Fall. Now that the Seven theme has been removed though, Apple has no more issues with the app and it can technically return to the Google Play store.
“We’ve spoken to legal representatives from Apple (who have been very nice, reasonable, and helpful), and they have no remaining concerns. But apparently, Google has a process for these things, and there’s nothing we can do to accelerate that process.”
That’s one of the issues with the Google Play store is that there really isn’t much communication with Google and developers so there is no telling when Themer will return.

ANDROID CODES

Tuesday, February 11, 2014

NEW CYDIA TWEAK Alkaline : Theme iOS 7 Battery Icon Without WinterBoard

Alkaline is a free Cydia tweak, developed by magn20, which allows you to theme your iOS 7 battery icon in the Status Bar without using WinterBoard as show in the picture below.
Alkaline Cydia Tweak
After installing Alkaline head over to its preference pane in Settings where you will find two options for themes (Bolus and Habesha). The theme Bolus is a slimmer version of the default battery icon found iOS 7. The theme Habesha uses bars and when it gets below 10% the lines will turn into numbers.
Users can create their own themes or they will be able to find other themes created for Alkaline in Cydia to install. After selecting a theme, users will need to respring their device inorder for the effect to take place. Alkaline provides a respring button in its main settings page after you select a new theme.
Alkaline Cydia Tweak Settings
Users will find a donation link, which is a pledge to help fight Neuroblastoma, a form of cancer. There are three links (NMTRC, Alex’s Lemonade Stand and Because of Ezra). Because of Ezra is operated by Kyle Matthews, owner of ModMyi.

Monday, February 10, 2014

NEW CYDIA TWEAK Favorite Contacts 7 For Notification Center

Feel like the Notification Center is missing something? How would you like to have quick access to your favorite contacts in iOS 7?
Favorite Contacts 7 is a tweak that lets users gain access to their contact favorites mostly anywhere on their iDevice using the iOS 7 Notification Center, developed by 2peaches.
NCFav
You will notice in the picture above that the widget displays the users favorite speed dial contacts from their phone application showing their names and contact photo’s in the Notification Center under the phone section in an iOS 7-like style.
After installing Favorite Contacts head over to the Notification Center preference pane in general Settings. This is where you can turn on and off the widget, and choose its position.
FavNC
Users have the option to have the tweak initiate a phone call, text message or email once they tap on any of their favorite contacts, or they can have it setup like mine to have the widget alert them and ask them what action they would like to perform.
NCFavCall
The widget also adds a preference pane in general Settings with plenty of options to configure.
FavoriteConSet1
Users will have the ability to show the first names, last names or hide them all together, showing labels, add five contacts per page if they would like, as well as the page indicators.
Finally, users will notice they can choose what options will come up if they set up an alert box or they can setup one standard action that will happen every time they tap on their contact.
Favorite Contacts can be found in the BigBoss repo for $1.99. I prefer this widget over the Quick Contacts tweak, because users are limited to reaching their favorites only on the SpringBoard. Let us know what you think about this widget in the comments section below.

NEW CYDIA TWEAK FLAGPAINT 7 Give Your Notifications Some Color


How would you like to add some additional color to your notifications?
FlagPaint7 changes the tint color of the notification banners depending on the colors of the application icon.  The tweak is developed by HASHBANG, supports iOS 7, and has a ton of cool features that you won’t want to miss out on.
FlagPaint7 Screenshots
After installing FlagPaint7 head over to the Settings application where you will find its preference pane. The tweak offers options to turn on or off the tint background of banners, lock screen and notification center.
Users can choose whether or not to have a larger application icon displayed in notifications and the ability to hide or show album artwork in any music-based notifications. There are four options to select for banners such as, use a gradient, semi-transparent, round borders and a text shadow. Text shadow will not work with the TinyBar tweak. Finally, users can hide or show, the application icon, the grabber and the “Now” label in banner notifications.
FlagPaint7 Cydia Tweak Settings
TinyBar fans will be glad to know FlagPaint7 is compatible with it. It’s also worth noting that FlagPaint has been around longer than Coono (a similar tweak), and Coono seems to have limited functionality. While FlagPaint7 is 99 cents, it’s a free upgrade for those who already own FlagPaint. There is a lite version of FlagPaint7, but the free version does not tint the lock screen or notification center banners.

HOW CAN I DISABLE FIND MY IPHONE WITHOUT PASSWORD

iOS 7 Bug: Disable Find My iPhone Without Password
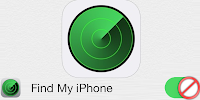
disable find my iPhone
Most of us know that iOS is the most secure smartphone OS ever, but
despite Apple’s reputation to keep the level of security top notch,
there are still bugs that are able to bypass the security.


Lately it has been unveiled that it is possible for an iOS user to
deactivate the Find My iPhone feature, without having to enter in a
password and makes the Find my iPhone feature dysfunctional.


The video in this post shows this bug and it is quite easy to
replicate as it seems. And though it is a simple thing that you can try
out, it doesn't look like it's for devices running iOS 7.0.x.


The bug also doesn't affect the devices running iOS 7.1 beta
versions, so it might just be that Apple has taken it into notice and
is making efforts to ensure that the issue doesn't prevail in the long
run. However, it is still alarming to know that anyone can disable this
tracking feature even without access to a password.
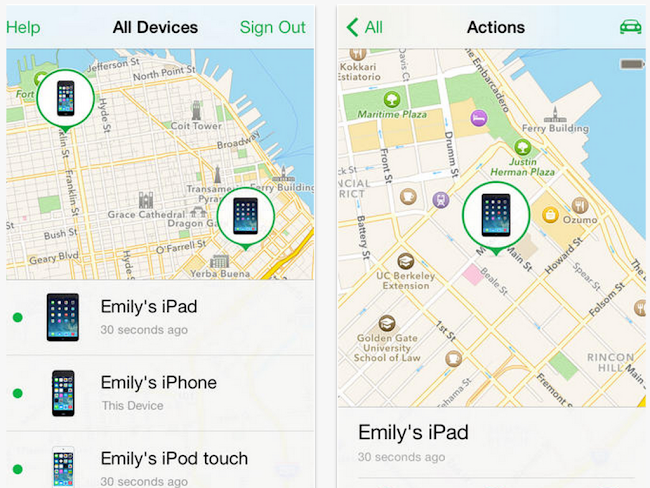

remove find my iPhone


Apart from the good news that Apple has acknowledged the problem and
has started doing something about it, the good thing is that the issue
doesn't affect the Activation Lock
system. This implies that if your phone gets stolen and the device
wiped, it will require an Apple ID and password for normal functioning.


Anyone who can access the Settings menu can disable Find my iPhone,
so we recommend that you active the Touch ID or passcode to keep things
safe. And when iOS 7.1 comes, download it because we're expecting the
bug to be completely fixed in that firmware version. So the changes made
will require a password to enter Find My iPhone.


And iOS 7.1 isn't that far from the GM build because the 5th beta was
released just a few days ago, and because Apple normally stays at 5
betas and maximum 8, the OTA GM update is coming soon.


Disable Find my iPhone Feature Without Password

This video shows exactly how to disable the Find My iPhone feature without using a password.

HOW TO CHANGE DEFAULT PASSWORD ON IPHONE And iPod Touch In OpenSSH


OpenSSH is an application that allows you to transfer files from your iPod Touch or iPhone to your computer over WiFi. It is extremely useful for developers, installing complicated WinterBoard themes, examining data and much much more. OpenSSH is a great application, and it allows you to open up and view your iPod Touch or iPhone’s file system. However just recently it was discovered that a hacker found a way to use openSSH to install virus’s and steal sensitive data from users who had installed the application without changing their default password. In this post we are going to learn how to change your password in openSSH.
**Note please read the following post before installing openSSH. While openSSH is fairly safe and stable if you change your default password it can still lead to security issues…
Cydia

Downloading And Installing OpenSSH

Downloading and installing openSSH is an extremely simple process!
Step 1) - Launch Cydia from your SpringBoard, and then go into the search panel and type in “OpenSSH”. Click on the openSSH icon from your search results and you will now have the option to install it.
Step 2) - Click install openSSH and once it finishes installing hit the finish button.
Step 3) - With openSSH now installed we must install one more application. Go back into the search panel and type in “terminal”. Click the terminal icon when it comes up from the search results and click to install it. After it finishes installing restart your iphone by holding down the power button for up to 5 seconds and sliding the shut down button across the screen.
Step 4) - Congratulations you have just installed openSSH!

Changing Our OpenSSH Password

We have now installed openSSH, but before we can learn how to use openSSH we must change the default defined password to something of our choice. This will ensure maximum security from virus threats and it will keep your iPhone safe.
Step 1) - For this next step we are going to have to launch the terminal application; you should see the Terminal icon on your SpringBoard.
Step 2) - Once the terminal application loads we are going to type in the following commands (these commands are case sensitive so type them exactly as shown below).
su
alpine
passwd
(enter a password of your choice)
Step 3) - we have now successfully changed our openSSH password. Click anywhere on the terminal screen and click the exit icon to quit the terminal application. Make sure you don’t forget this password as there is no way to recover it once it is lost.

SEMISTORE Will Soon Be Updated For iOS 7, Will Use OpenSSH Instead Of AFC2

The Evasi0n7 Jailbreak won’t work with the upcoming iOS 7.1 software update due to the fact that Apple has patched numerous vulnerabilities Evasi0n7 utilized. As such if you wish to maintain your Untethered Jailbreak it is recommended users stay far away from it.
With that said once iOS 7.1 is released one of the issues that often arises is the fact that you cannot restore your device as Apple forces you to restore to the latest firmware version currently available.
Luckily, however, CoolStar, the developer of SemiRestore has just tweeted that he is planning on updating his tool for iOS 7 and there will even be a linux version.
BgFGfE4CQAAg-HV
Just what is SemiRestore? Well the tool is the closest thing you will get to a restore once iOS 7.1 is released. It was first made available during the iOS 6 firmware generation and can come in handy when you get into a reboot loop issue because of a buggy Cydia tweak.


CoolStar has tweeted that he plans to use OpenSSH for the iOS 7.0 version instead of AFC2 (a file connection protocol), which was used for iOS 6.x. As such it would be a good idea to install OpenSSH on your device right away so that when SemiRestore is released you will be able to take advantage of it if an issue ever arises.

How Much An iPhone Would Have Cost Back In 1991

With the introduction of the iPhone and the smartphone in general people carry more computing power than the Apollo 11 computer at all times.
Now an analysis by Tech Policy Daily tries to find out how much the iPhone would have cost in 1991 and the results are pretty staggering to say the least. The analysis is based on the following:
Screen Shot 2014-02-10 at 7.46.57 AM
Back in 1991 flash storage would have cost $45,000 per GB. Considering a 32GB iPhone 5s, the total cost is $1.44 million.
Processors cost roughly $30 per MIPS (millions of instructions per second) in 1991. As such when you factor the A7 chip can execute 20,500 million instructions per second the cost would be about $620,000.
Now getting to the wireless equipment, in 1991 the cost was $100 per kilobit per second, and that the present day iPhone gets around 15Mbps over LTE, so the radio would have cost $1.5 million.
Considering only memory, processing, and broadband communications power, duplicating the iPhone back in 1991 would have (very roughly) cost: $1.44 million + $620,000 + $1.5 million = $3.56 million.
These calculations do not factor other functionality of the iPhone like the camera, software, display etc. but the next time you want to complain about only having an iPhone 5 remember the value of your iPhone would be in the millions back in 1991.

INTRODUCING IPHONE 6 - 3D concept video

If the rumor mill holds any truth, which more times than not it does,
Apple is set to deliver a major refresh to the iPhone this year and
will deliver two new iPhone models with two different sizes. Both are
reportedly going to feature larger screens than the current generation
iPhones.


Screen Shot 2014-02-10 at 8.10.09 AM
Now a new concept video by ConceptsiPhone showcases what these two new iPhones could actually look like.


Just like every concept video some of the features are a little “out
there” but regardless it is a great concept nonetheless. Here’s the
entire feature list:


  • Retina 2 display with YRGB pixels
  • SolarCharging through the Sapphire display
  • A bigger 5.1-inch display with the same body size as the iPhone 5s
  • 10 Megapixel camera
  • 4k video recording with up to 500ffps slow-mo
  • Lightning 2 with 10x faster data transfer and better battery charging
  • Thinner design (6.1mm vs 8.1mm) thanks to MINI AUX
  • Stereo sound In/Out

NEW CYDIA TWEK With This Tweak You’ll Never Have To Let Anyone Borrow Your iPhone Again

Let’s be real. When you first get your iPhone you are pretty protective over it, heck sometimes this protectiveness never goes away. If you’re a protective iPhone owner when someone wants to borrow your handset it is probably safe to say you cringe while trying to come up with some excuse.
VRxYeux
Well with the CCFakeLowBattery Cydia tweak you no longer have to worry. What this tweak does is add a new button to the control center which allows you to toggle the charged status of the battery level. So you can simply enable the toggle and then tell whoever just asked you to use your iPhone that it’s about to die.
There’s a Reddit thread on this tweak with people arguing over the effectiveness of this tweak, but it’s worth a shot. You can find CCFakeLowBattery for CCToggles in the BigBoss repo for free.

Sunday, February 9, 2014

IPHONE 6 Concept with Larger Screen & Stunning Design

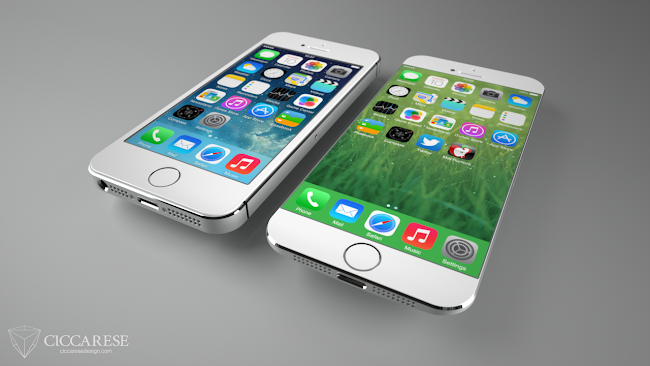
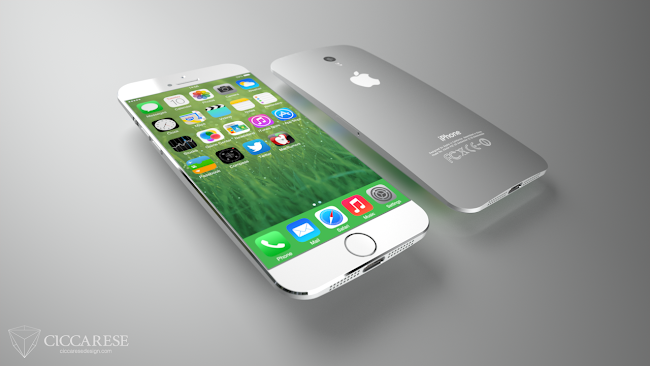
You might have seen several iPhone 6 concepts on the web so far, but the one we're going to cover today is nothing like before. It comes from the renowned Italian 3D artist Federico Ciccarese who has made a drawing of what the iPhone with large screen could turn out to be like.
And just as with most of the iPhone concepts designers have made so far, this isn't likely to turn out a reality, but there's no harm in dreaming. Keeping that thought, take a look at the iPhone 6 mockup images made by Ciccarese.
iPhone 6 + iPhone 5s
He also mentions on his site that a bigger canvas would make way for the icons on the Home Screen to receive recognition… a 5.5 inch iPhone would include a 6th icon in the dock for example. A thinner appearance and a tapered back (just like it was in the case of iPhone 3GS) would allow for a more comfortable grip.
iPhone 6 vs iPhone 5S
The device with a 4.7 inch screen is purported to have a 750*1,388 pixel resolution and the large iPhone would go bigger with 5.5 inch screen and a resolution of 878*1,568 pixels. And if these iPhone 6 resolution expectations are compared, the currently available iPhone 5s, iPhone 5c and iPhone 5 come with a resolution of 640*1338. You can also notice the edge-to-edge design, which is amazing to say the least.
iPhone 6 2014
A no side bezel would also make a 5-inch iPhablet that isn't quite big in size and can be used in a single hand. This edge-to-edge screen is questionable as a smartphone standard, but it should be noted that a sapphire-hardened front glass with be built for future iPhones in Messa Arizona, a new plant of Apple.
iPhone 6
Also, the biggest unknown for the upcoming iPhone is the form factor, because the current unibody with the steel frame becoming the antenna has been around for 4 years. The iPhone 5 saw the replacement of the glass cover with a two-tone metal backplate on the back, but there were only slight differences when it comes to the chassis between the iPhone 5s and the iPhone 4.
iPhone 6 desigh
iPhone 6
So it's not known whether will recuse the existing four year old design or come up with a radical new look for the next iPhone. Liquidmetal doesn't look near so far, even though Apple has worldwide rights to advanced alloy liquidmetal.
Where do you see the iPhone 6 in terms of design?

NEW Cydia Tweak Guest Mode

One feature of iOS that has been heavily requested, especially on the iPad, is a guest mode functionality that would work just like on the Mac. Ideally the users would be able to select which apps are available in guest mode and hide or at least password protect them when the device has entered guest mode.
This would be useful for when you want to pass your phone around to play games, let other people use them to call their friends, and showcase your latest iPhoneography.
GuestMode Cydia Tweak
There has been ways to do this in the past with various tweaks, but now a new tweak which was just released called GuestMode which will bring guest mode functionality to iOS 7.
The tweak functions very simply and the main configuration option for this tweak is deciding which apps the user should have access to when in guest mode. There are also additional per app configurations allowing others, for example, to only access the dialer in the Phone app.

How To Send iMessages From Your Web Browser On Any OS

Apple released Messages for OS X Mountain Lion for Mac users to stay in touch with other iMessage contacts through their computer and what a great idea it was! Unfortunately, however, if you have a Windows or Linux computer or don’t have access to your Mac then you are limited to how you can communicate.
RemoteMessages-1
Not to fear though, if you have a Jailbroken device you will be glad to know a tweak by the name of Remote Messages replicates as much functionality as possible of the Messages app in any modern browser like Chrome, Safari or Firefox.
RemoteMessages-2
The tweak isn’t new, but it has been updated for iOS 7 and 64-bit devices. The other benefit of Remote Messages is you can send both traditional SMS and iMessages. You also get features like file attachments, camera roll access, contacts and pictures and much more.
Remote Messages Cydia Tweak Settings
You can download Remote Messages from the BigBoss repo for $3.99. If you owned the previous version it is available for only $1.99.
Once you go ahead and install the tweak here’s how you set it up.
  1. Go into Remote Messages preferences tab in the Settings app and set a username/password you wish to login with. You may also set any port number you wish.
  2. Next simply slide the Enable toggle to the On position and allow a few seconds for the tweak to activate (if you are having issues connecting to the server reboot your device).
  3. Now simply ensure that both your iOS Device and computer are connected to the same Wi-Fi network.
  4. With that said take note of the IP address displayed at the top of the Remote Messages preferences panel and enter that into your web browser follow by : , then the port number. Example: http://192.168.1.5:455
  5. Lastly authenticate yourself and you are golden!

Google AdSense Account Application Approval Process for Beginners

Google AdSense account is the best and trusted way to make money online. Some bloggers provide guides to improve website for AdSense such as quality content, privacy policy page, about page, contact page etc. But this guides only improve your blogs for AdSense application qualified. Many blogger and website owners really afraid to face application process. Because nobody knows what happening inside AdSense approval process.

Experienced bloggers know various methods to make money via blogging. But begging level bloggers only one hope is Adsense.

What is Google AdSense application approval process?

Google use two steps verification process to complete your AdSense application review. First step they verify your email address, site address, residential address etc.

If your application complete 1st step review, they provide AdSense account access to create ad codes. If you create and place ad codes in your website, they started 2nd step verification process. They analysis relevant ads for your site. If your website pass this two step verification, they sent email for verification or ads running in your website.

Google officially said Adsense Application approval process time is

If Adsense application submitted you will receive email about your application within 6 to 8 hours.

If you create and paste Adsense codes in your blog and Google system detects your Adsense code, Google automatically review your website with in 2-3 days.

But each bloggers face various days to complete AdSense application process. I am research about this topic. This research end with common reasons for AdSense application process delay. They are,

  1. Adsense ad code not implemented in your blog (They not create and paste ad codes inside their blog)
  2. You wrongly paste Adsense codes inside iFrame
  3. Google Adsense crawler can not access website pages ( some times your robot.txt file contain command to unindex or block pages)
  4. Crawler report is updated weekly
How many ad codes i need to create and apply?

Just create one or two ad unit (Don’t create and use more than 3 ad units). Apply this ad codes in your blog sidebar or inside post. If your CMS is WordPress use Quick AdSense plugin. If your blog already have affiliate marketing ads, remove the affiliate marketing ads.

Tips to help your Adsense application status running well.

Add the following line in your website robots.txt file

User-agent: Mediapartners-Google
Disallow:

This line provide full access to AdSence crawler.

Verify your email address using phone verification. Sign in and verify Google web master tools and Google analytics.

My AdSense application process running over week.
Check your website Google web cache using cache:yourwebsitename.com

This is the best way to find crawler last visited time to your website. Google crawler and AdSense crawler are separate. But they share your website cache page. So wait your ad code placed date appear on Google cache. If the Google cache page show your AdSense placement date use this form to find AdSense application status. If you can’t login your AdSense account use this form.

How to confirm AdSense account approved for your site?

If you find any of these, you got an AdSense account.

  1. Red bar across the top of AdSense account is gone
  2. Ads appear on your website
  3. You got email form Google as your AdSense application fully approved. Within few hours you will begin to see live ads.
Common reasons for Adsense application rejected

  1. Insufficient content ( your website must have 30 to 50 posts with minimum 500 words (defend on topic)
  2. Account information matches currently approved Adsense account (duplicate of an active Adsense account)
  3. Unacceptable site content (copyrighted materials)
  4. Page Type (navigation and side look)
  5. Unsupported language
  6. Age under 18
  7. Adult, Gambling and some restricted topics.
  8. Site not comply with Google program policies
  9. Site not old 6 month (for some countries include India and China)
  10. Your blog not based any proper adwords categories
Common AdSence application process related problems and solutions

  • You received email from Google when your account was approved. but if you go to the AdSense account page it still says “under review”.Check your email first. If they say “congratulations! your AdSense application has been fully approved. Within a few hours you will begin to see live ads.” your account was approved. If they say ” Your Google AdSense application has been approved. To activate your account and get started with AdSense, follow the steps below.” your AdSense account partially reviewed. So you must wait another confirmation email from Google.
  • You got an email as your AdSense application fully approved, but no ads appear and red bar still show under review. Wait 1 or 3 days. Google system take some time to update your information. But your account actually approved.
  • AdSense still under review after 1 week, 3 month and year. Check if you create and paste ad codes in your website. Also use AdSense application status form.
  • AdSense application rejected every time, but my site have quality contents (minimum 30 to 50 posts with 500 words), about page, privacy policy page and contact page and my site complete 6 month (for India and china). First you need to crate another email which contain your name not your website name [ ex: your name is john. create email like johnformsg@gmail.com and verify this email using phone verifiction]. Connect your Google web master tools account, analytics account and verify this accounts.
  • I am not getting any confirmation email from Google. But ads are running. Congratulations! your AdSence account fully approved. Don’t worry any other things.
Some useful Google links to find out AdSense related topics.

New publishers application process

Application Review waiting time

How to implement Adcode

Application issues troubleshooter

Content ads not showing

TEMPLE RUN 2 HACK

(Temple RUn 2 Savegame file with 999,999,999 Diamonds and Coins hack!!!)
*ROOT NOT REQUIRED

Follow the steps:
* Backup your current savegame file if nencessary
1. Download "gamedata.txt" (only 3KB file) (link is below)
http://www.mediafire.com/download/p1c6n6qoc25ssjd/gamedata.txt
2. Copy "gamedata.txt" using your "File manager" to:
/sdcard/Android/data/com.imangi.templerun2/files
3. Replace existing file!!!

Saturday, February 8, 2014

IPHONE 6 Concept With Larger Screen, Tapered back And Bezel-Less Design

Recently we have been hearing from the rumor mill that Apple is likely to release two new iPhone models this year. One will be an iPhone with a 4.7-inch display and the other with a 5.5-inch display. As such Ciccarese Design has released new renderings based off these new specs to give us a good idea on what  it might look like. It also gives us a look at how the homescreen could be arranged with a larger screen.
iPhone-6-04-cd
These are the screen resolutions Ciccarese Design has considered:
  • iPhone 6 4.7″ 750×1338 px Aspect ratio 16:9
  • iPhone 6 5.5″ 878×1568 px Aspect ratio 16:9
  • iPhone 5S 4″ 640×1138 px Aspect ratio 16:9
As you can see in the comparison image below the 4.7-inch iPhone has a 5 x 6 icon grid, while the 5.5-inch iPhone is able to fit a 6 x 7 icon grid. The iPhone 5s show to the left is of course based off a 4 x 5 home screen icon grid.
iPhone-6-06-cd
Ciccarese Design imagined a tapered back, but a recent report from the Wall Street Journal dismissed that claim. And as for the bezel-less design that hasn’t been talked about too much so it is still up in the air

Friday, February 7, 2014

HOW Make a Private Folder with password

Make a Private Folder with your password

Step 1:- Open the Notepad.exe
Step 2:- Copy the following code into the notepad.

Quote: cls
@ECHO OFF
title Folder Private
if EXIST "Control Panel.{21EC2020-3AEA-1069-A2DD-08002B30309D}" goto UNLOCK
if NOT EXIST Private goto MDENTER PASSWORD TO OPEN
:CONFIRM
echo -----------------------------------------------------------
echo ================== HarryHacker ==================
echo -----------------------------------------------------------
echo Are you sure you want to lock the folder(Y/N)
echo Press for Yes and Press (N) for No.
echo -----------------------------------------------------------
set/p "cho=>"
if %cho%==Y goto LOCK
if %cho%==y goto LOCK
if %cho%==n goto END
if %cho%==N goto END
echo Invalid choice.
goto CONFIRM
:LOCK
ren Private "Control Panel.{21EC2020-3AEA-1069-A2DD-08002B30309D}"
attrib +h +s "Control Panel.{21EC2020-3AEA-1069-A2DD-08002B30309D}"
echo Folder locked
goto End
:UNLOCK
echo -----------------------------------------------------------
echo ==================HarryHacker ==================
echo -----------------------------------------------------------
echo Enter password to unlock folder
set/p "pass=>"
if NOT %pass%== YOUR PASSWORD goto FAIL
attrib -h -s "Control Panel.{21EC2020-3AEA-1069-A2DD-08002B30309D}"
ren "Control Panel.{21EC2020-3AEA-1069-A2DD-08002B30309D}" Private
echo Folder Unlocked successfully
goto End
:FAIL
echo Invalid password
goto end
:MDENTER PASSWORD TO OPEN
md Private
echo Private created successfully
goto End
:End

Step 3:- Now change the password in the if NOT %pass%==YOUR PASSWORDgoto FAIL line replace text of Your
Password with your password for the folder lock.
Step 4:- Now save this file as locker.bat and you are done.
Step 5:- Now Open the Locker.bat file and enter your password to open a private folder of yours.
Step 6:- Now copy paste the files which you want to hide and make it secure in the private folder.
Step 7:- Now again open the Locker.bat file and press 'Y' to lock the private folder with your password.
Step 8:- Now to again open the secured files open the locker.bat file Enter your password and your files are there for you.

How To Send SMS From Computer Using AT Commands With GSM/GPRS Modem

How To Send SMS From Computer Using AT Commands With GSM/GPRS Modem

1. Plug In Your GSM/GPRS modem

2. Find out which COM Port the modem is connecting

3. Start-> Accessories-> Communication-> ­ Hyperterminal

4. Open new connection

5. "Connect using:" the correct COM port, you will see a
windows->change ­ Bits per second to "9600" (for GSM)"115200" (for GPRS)

6. Type "AT" and press Enter (it'll show "ok")

7. Type "AT+CMGF=1" and press Enter (it'll show "ok". It is to set the GSM / GPRS modem to operatein SMS text mode. )

8. Type "AT+CMGW="+6512 ­34567" " and press Enter (it'll show ">"."+65" is country code,"1234567" is recipient's number)

9. Start typing SMS. When finished,press Ctrl + Z (it'll show"+CMGW:1", it means the message is stored as index:1 in the message storage)

10. Type "AT+CMSS=1" and press Enter (It'll show something like"+CMSS: 219". "219" is the reference no of the sent message)

11. If it shows "OK" at the end, it means the message is successfullysent.

Thursday, February 6, 2014

HOW CREATE FREE WEBSITE Without Any Development Knowledge

Create Free Website
6C6UD7EDCQNX
Many times normal internet user always think about creating their own website but almost 70-80% from all then put their hands back own their decision just because they think that creating their own website needs to invest. I also agree with them at some extent because to start any business website or any high class professional website need some input then you have to buy your own domain name, Web Hosting or even a Dedicated server depend on their services and but overall these things are costly for those who just want to create website for personal interest or just for fun then don't worry all about these things and I am sure at end of this article you will must be able to start free website.
Now Here are some Best networks where you can create free Instant Website Without any Skillful knowledge about designing and developing. In these networks all designing tools are available and simple Drag & Drop method is mostly in all of them.

1. Weebly.com 

Before creating account in Weebly you have to choose type like what you want to create a Blog, forum o Portfolio depend on your requirement and what you need. In weebly you can create your own choice sub domain and also you can buy own new custom domain. There are number of tools available to design website. Firstly you have to select theme then you are able to create multimedia content. Drag & Drop feature is also available here. Most Important thing in weebly is advanced users can also earn money by creating Ads slots.

2. Wix.com

Wix is famous and largest host group for free website creation. In wix you can easily choose any Template design according to your different type of Site category. Wix also contain HTML editor for customizing design but its easy to understand. After customizing you are able to Publish your own design within a secs and Wix also provides own choice sub domain facility.

3. Zoho.com

In Zoho you can easily choose any Template Design of your own choice. Drag & Drop feature is also available, So its easily to customize template design. In Zoho you can also insert Multimedia content into website. Zoho also contains numbers of Third Party Applications, So by using them you can easily make beautiful Website at Zoho platform.

4. Yola.com

Yola is best  website platform which contains Templates with Graphic Interface. After choosing your own choice catagory user can easily create website. In which user can easily customize theme, background, Layout and widgets of their own choice. User can choose any sub domain and user can track all widget through admin panel.

These above four networks which provide features that are easy to understand and no need any skillful knowledge about Web Designing or any charges for hosting means these network help to create instant Website for smart usage and just to provide information or creating Portfolios.

For Professional Platform I recommend
WordPress
Blogger (only domain charges)
Joomla
Drupal
Others

I hope you learn something new at free instant website network you can also upgrade your plan to professional if want. So must leave your reviews on all the listed networks and also leave your comment and other best network which you feel to be in the list

HOW CREATE AND ADD BLOG Badge/Grab it Button For Blogger

Every blogger want, that people should share or linkback his work. So to get more links towords your blog you have to do so effort. Normally we us different different techniques to increase baklinks reputation and This widget is one of them. I am also using same widget on my blog as Sponsor us to let people to linkback our blog. This widget is made by combination of Badge image and Anchor link to your blog. So if also want to create it for you then follow below steps. It simple and you can easily able to create and use and if you want to learn other useful tutorial then don't forget to read about other widgets


Steps To Create Your own Blog Badge

  • Firstly Open this link to create Blog Badge Visit Here
  • Then Simple Add Your Text, Font Size, style and Color according to your choice
  • After Making all chances then click on Create Logo Button
  • Now Download it and Upload it on blogger or Picasa to get host your image.

Customization Steps For Badge

  • After uploading your Badge Image Simple Copy its URL.
Code No 1
<center><div dir="ltr" style="text-align: center;" trbidi="on"> 
<a href="Blog URL"><img alt="Safe Tricks Badge" src="IMAGE URL" title="Title On Mouse Hovering" /></a>
</div></center>
1. Replace Blog URL  With your Blog address
2. Replace IMAGE URL With your Image URL which copied above
3. Replace Title On Mouse Hovering With your Text which comes on Hover.
  • After changing all things copy all the code.

 Finalized Steps For Badge

  • Then Paste above customized code in encoder and encode it.
Code No 2

<center><input type="text" onclick="this.focusundefined);this.selectundefined)" readonly value="Encoded Code Here" /></center> 
  • Now Replace Encoded Code Here with it output encode codes

Steps To Add Badge

  • Open Your Blogger Dashboard >> Layout
  • Click on Add an Element >> Open  Edit HTML/JavaScript box.
  • Then Paste Code No 1 and just below it paste Code No 2 and click Save button.
  • Finally your Badge button is Live on Your Blog
I hope You enjoy this widget. If you face any Problem Must leave your review in below code box.

HOW TO CHANGE BULLETS Style With Image Hover Effect In Blogger

As every blogger wants to make it post more stylish and attractive. So each and every thing matters while designing your blogger template. Whenever we post any article we mostly used number list or bullet list to describe points or steps. As default bullets are black in color. So to make then more attractive you have to do some effort. This widget will help you to make bullet list stylish and make your blog post more attractive. In this widget black default bullets are replaced with blue color bullets and Whenever someone hover mouse on it will turn into green. So to make changes into your default bullets simple follow below given steps.
change bullets blogger

How To Change Your Bullets Style

  • Open Your Blogger Dashboard >> Template
  • Then Click on Edit HTML and search for ]]></b:skin> 
  • After searching above code Paste below given code just above it.

.post ul { list-style: none; } .post ul li { line-height: 1.4em; 
background: transparent 
url(https://blogger.googleusercontent.com/img/b/R29vZ2xl/AVvXsEiTAcfLsNbbZE9OYUewHmPKgWEuMmougQ-cmefUAMJbsQXIhhh9qoqgVuRxCR-bifS5_MHmtzptXRrY-_aKQD-e8oIdKrsFqXJxLgMm4Ok-S2IT2GUPeYYpW7H82i7t2Yrc4vmMC53lmbPw/s6/blue-bullet-icon.png)
 no-repeat scroll 0 5px; margin: 0.3em 0; padding: 0 0 0.8em 20px; }


.post ul li:hover { background: transparent 
url(https://blogger.googleusercontent.com/img/b/R29vZ2xl/AVvXsEhyfL0mtSucZMOArX6tzmLweV1R46lg759CLozTpaYyKkZ3-qqBXU1h3VTrUugZin37mZ86S9JYyxH1hgIUNQrje4A54Y20hRdH-zYP_9JQ_hiOjSpGr5_m4tBwi32ftJNjLBJc5IYZNG8v/s6/green-bullet-icon.png)
 no-repeat scroll 0px 5px; }
  • After Pasting click on Save Button.
  • Now Check your any post which contain bullets list or create any new post to check.

Some Customizations

  • If you want to change alignment of bullets horizontally then change the value of 5px
  • If You want to replace Bullets with any another image then replace Image URL in color code of              

HOW TO ADD IMAGE TILT Image Hover Effect on Blogger Posts

Tilt image effect
Images play an important role in designing. So try to make each image stylish. Within the post mostly everyone focus on images in understand better about that topic. So to make images more beautiful today i going to introduce some piece of codes which gives tilt effect on mouse hover. Means when someone hover mouse button on the image it will bend little bit which makes your blog design more better. Simple add the code into your template then if will work for each and picture of blog post. So before using must check out the demo given to check out its working simple move your mouse and after testing demo if you want to add this effect on your blogger post then follow below given steps.

Demo of Tilt Image Hover Effect


blogger logo

How To Add This Tilt Hover Effect

  • Open Your Blogger Dashboard >> Template
  • Then click on Edit HTML and Search by ctrl+f into coding box for ]]></b:skin> 
  • After searching above code simple paste below given coding just above ]]></b:skin> 

.post img:hover {
-webkit-box-shadow:  0 3px 6px rgba(0,0,0,.5);
-moz-box-shadow: 0 3px 6px rgba(0,0,0,.5);
-webkit-transform:  rotate(-3deg);
-moz-transform: rotate(-5deg);
}
  • After Pasting above code simple Save Your Settings
  • Now open your any published blog post and test out by moving mouse on it.
For More Widgets:- Important Blogger Widgets And Plugins

If you like this tutorial don't forget to share it with others.